Set Up Preview
When Editors create content in the Agility it's essential that they can preview what that content will look like in their digital solution (i.e. website) before they publish it.
To support this, Agility provides a way to register your website Deployments and associate them with a Sitemap which allows Agility to launch a preview window when Editors click the Preview button within their instance.
Agility will automatically preview the page that the Editor is working on, providing a seamless Preview-then-Publish experience for the editor.
Setting-up Preview Deployment
In order for preview to work for all Editors, you must deploy your site to a website host. Agility supports automated deployment flows for several providers, but in this example we'll look a how to set one up manually.
For Agility to know what URL to route the Editor's preview request to, it needs to know the URL for your preview deployment.
When deploying a website that you want to use as a preview deployment, you'll need to ensure that the Preview API Type is being used and that its using a Preview API Key. A preview API key can be created/retrieved the the API Keys section.
A preview deployment can be configured one of two ways:
- Your site is always showing Preview content - This would mean you've set it to always use the preview API key, likely as an environment variable
- Your site will show Published and Preview content, but only Preview if it came from Agility - If an Editor clicks Preview in their instance, they'll hit the same production site, but the site will automatically recognize that a preview request came from Agility and would alter its logic in order to use the Preview API key
In most cases #1 is the simplest to set up, however #2 has some advantages in that you don't need to maintain a separate preview deployment.
Registering Your Preview Deployment
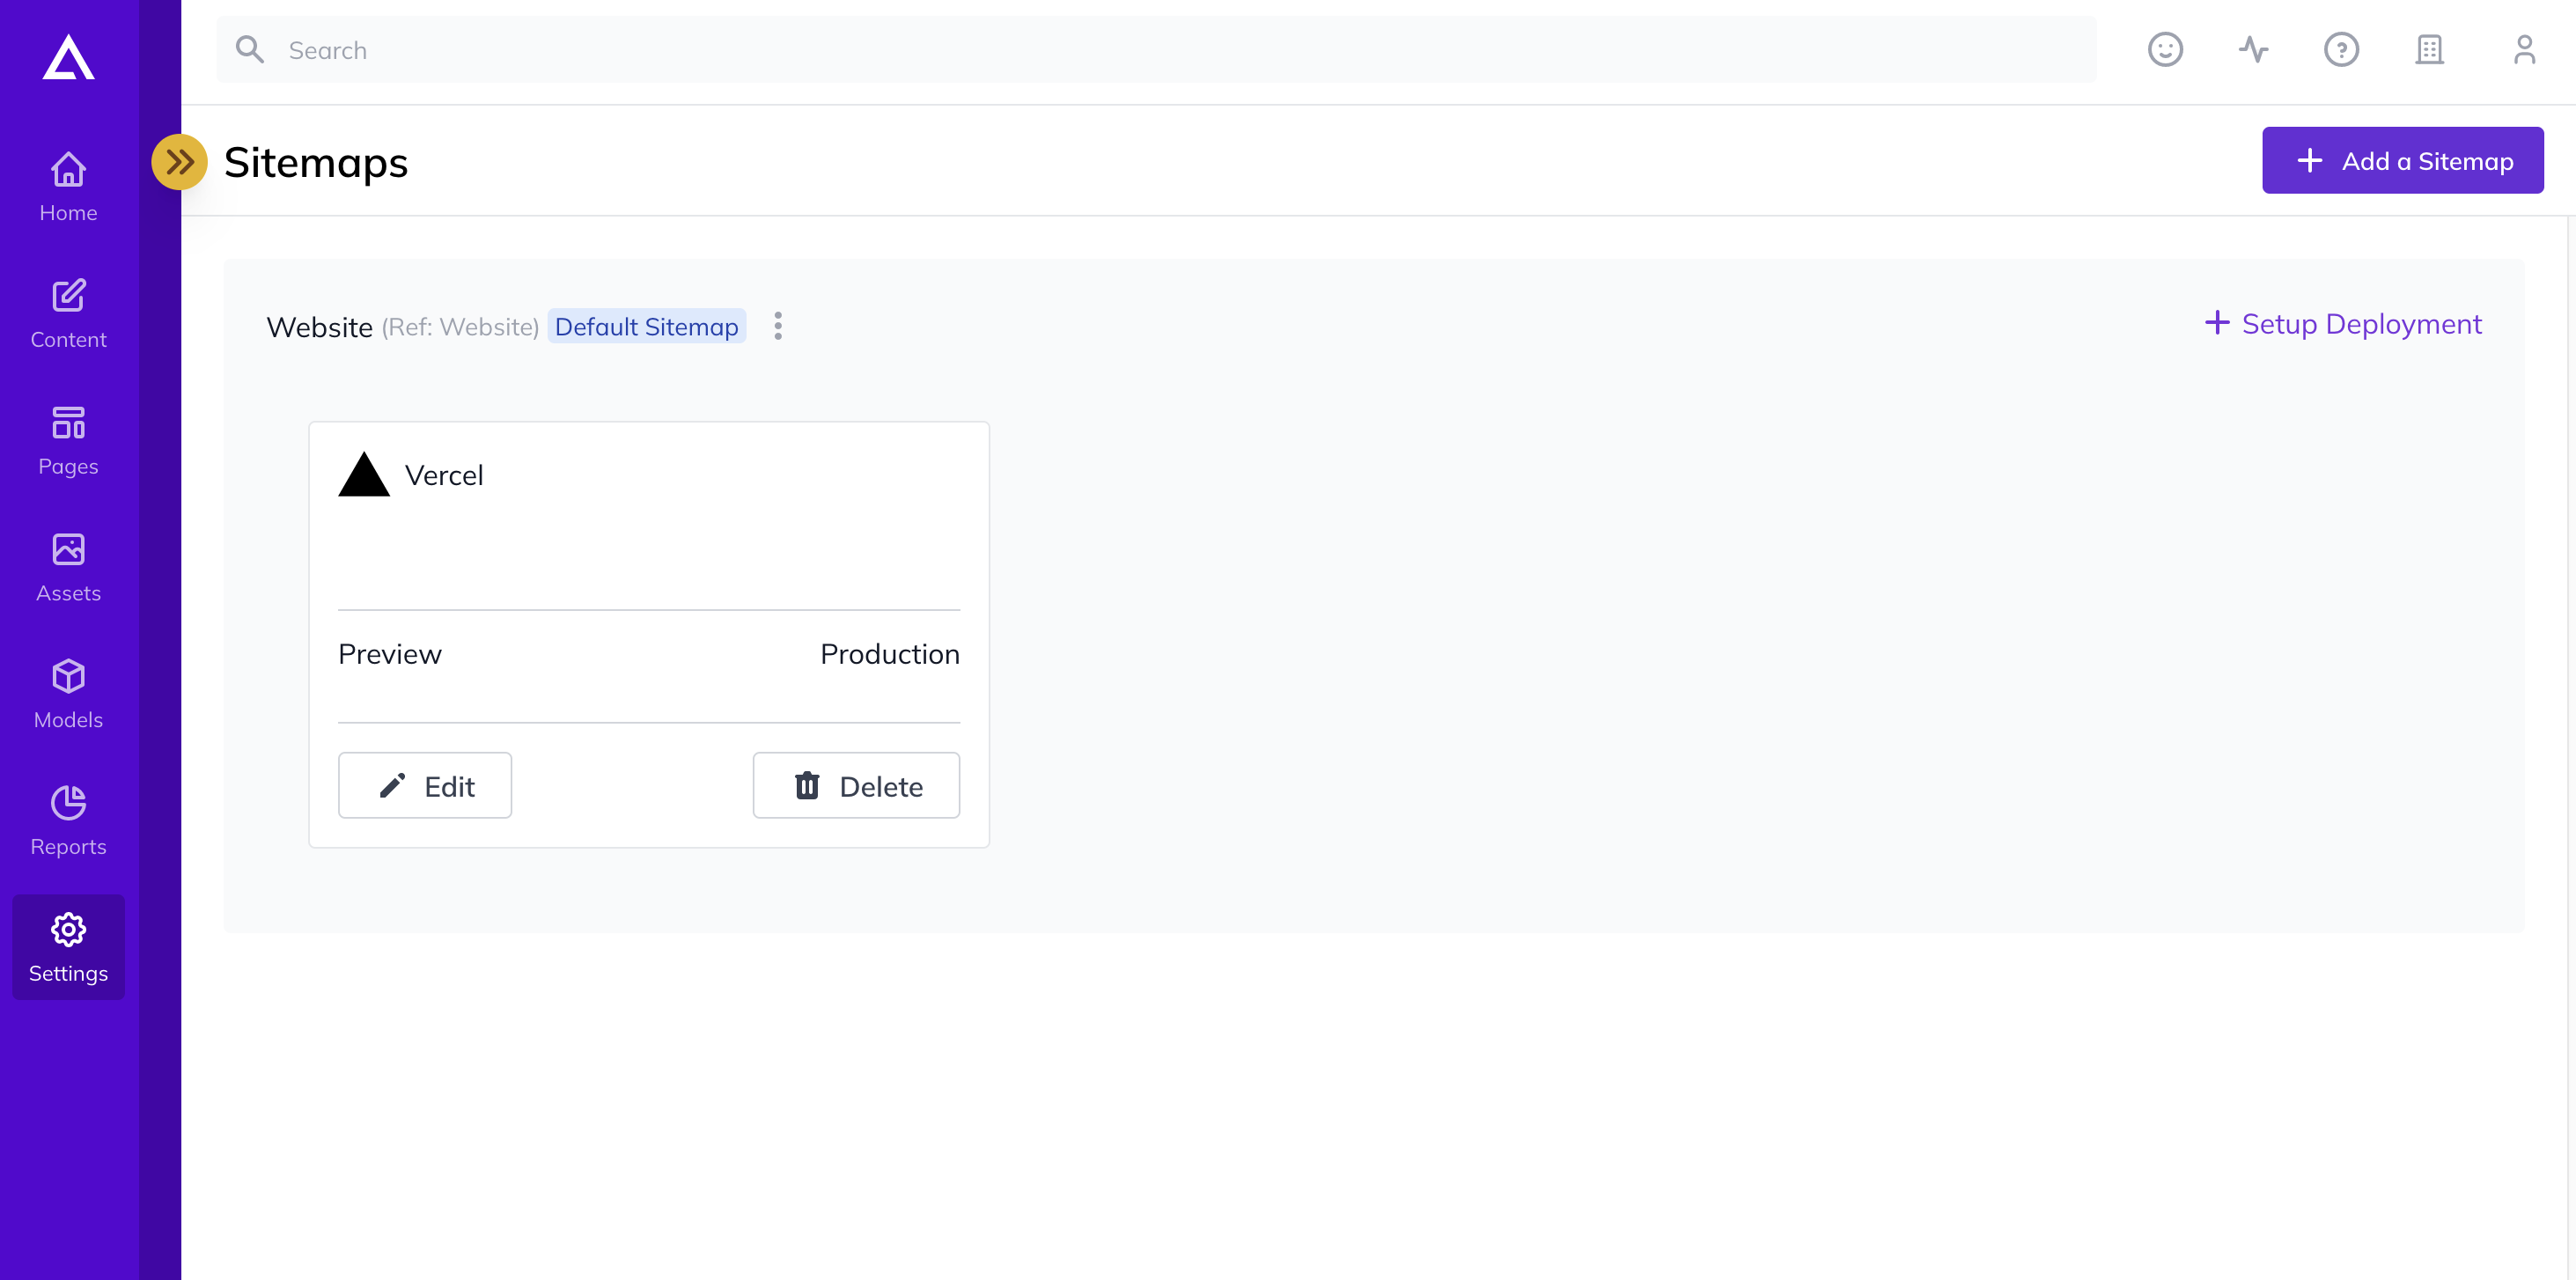
1. Go to Settings > Sitemaps and click the + Setup Deployment button
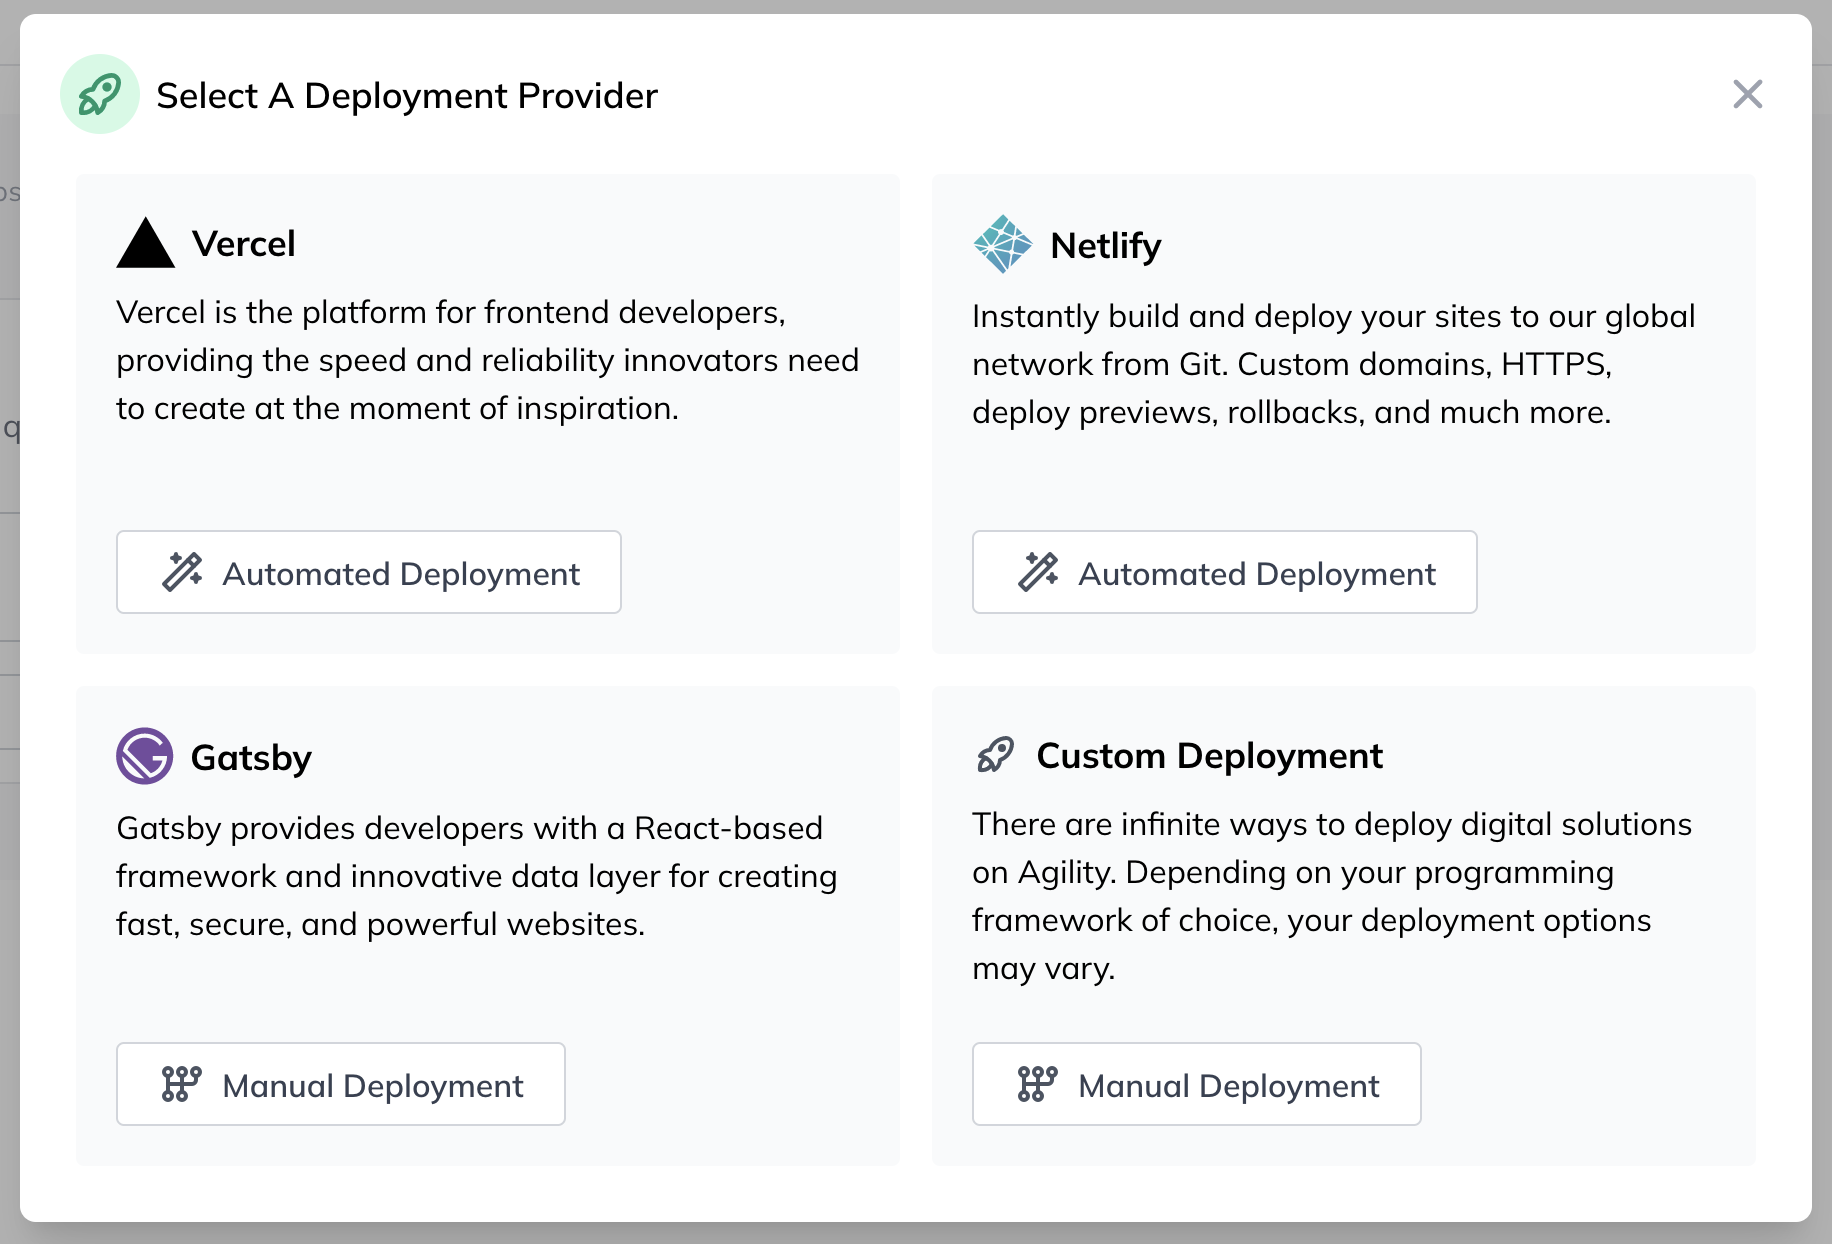
2. On the Select a Deployment Provider pop-up, select Custom Deployment.
3. Fill-out your Deployment information
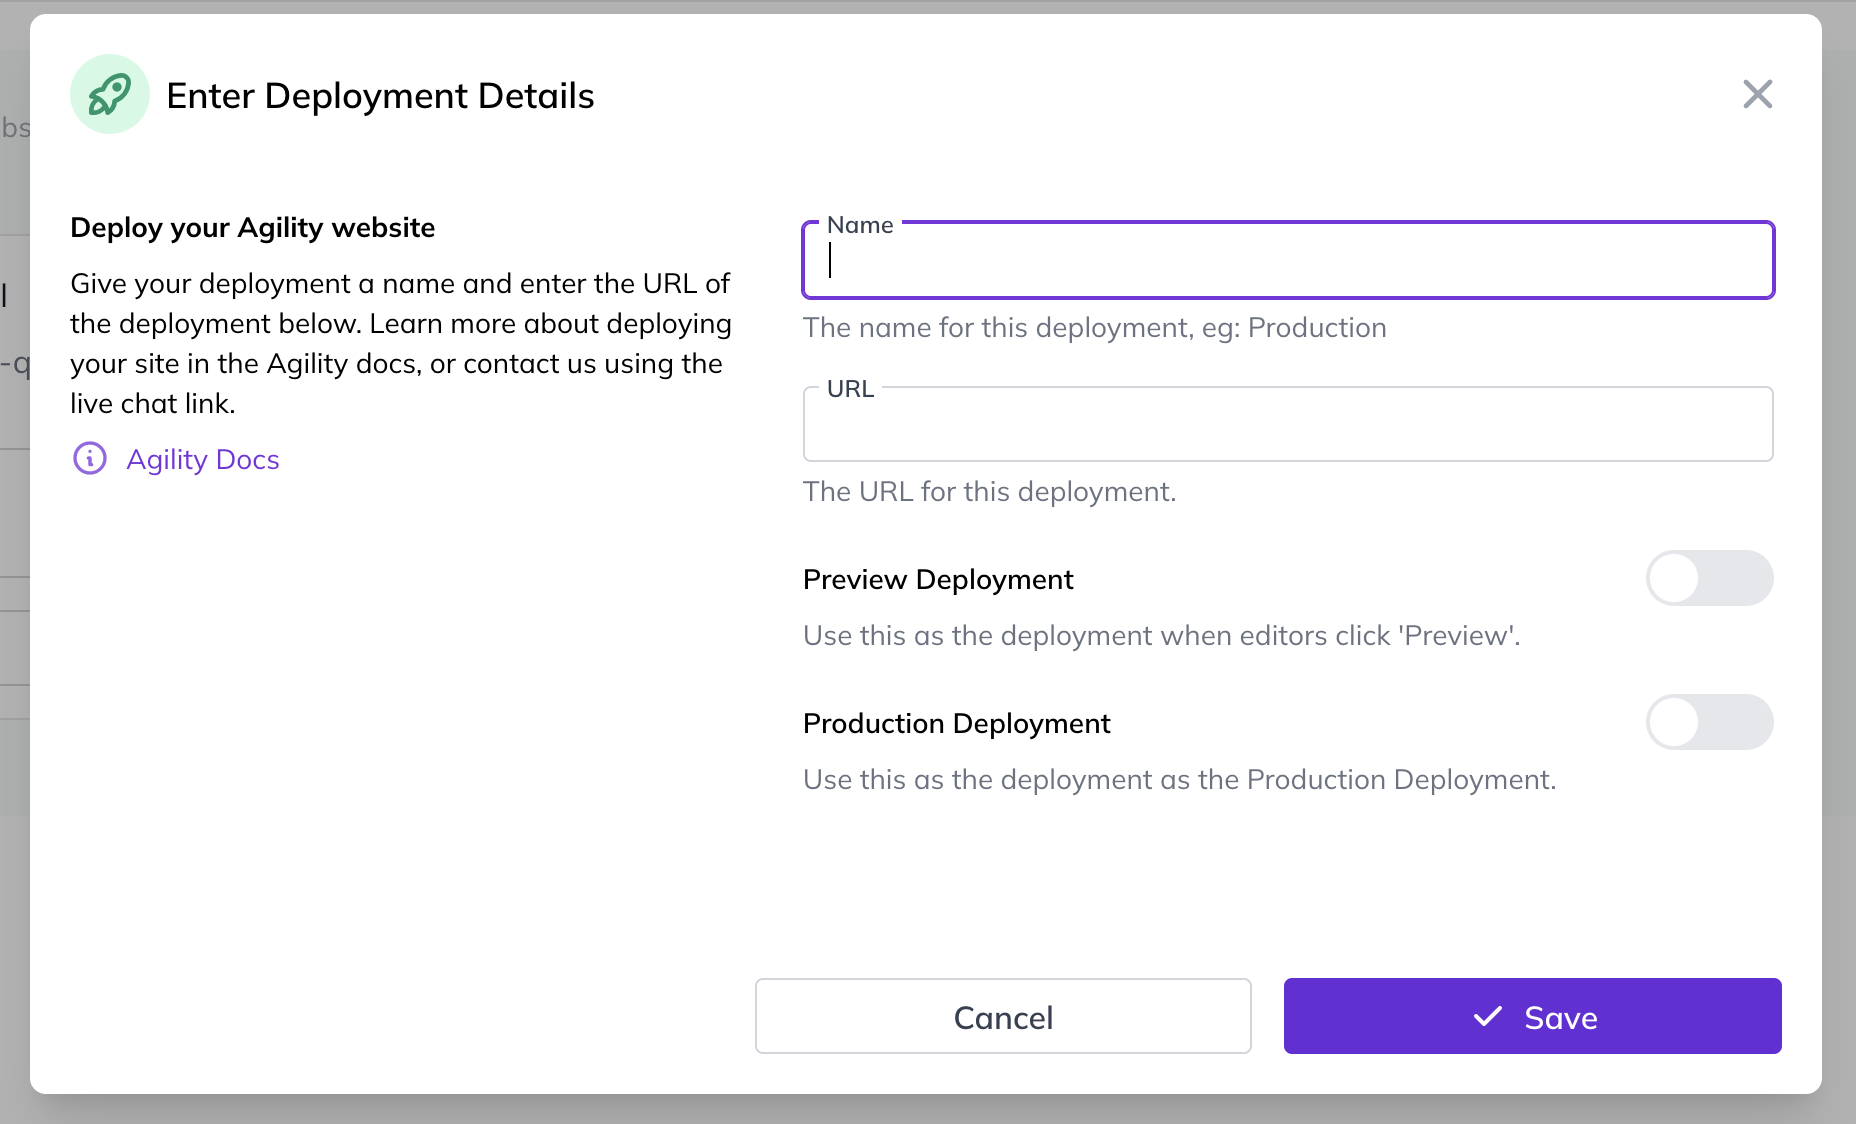
- Name - Enter the name of your deployment, we recommend using this field to identify what kind of environment it is (i.e. Production, UAT, or Preview).
- URL - Enter the URL of your deployed website (i.e. https://agilitycms.com/). You can also apply a page path if your site is deployed as a micro-site (i.e. https://agilitycms.com/docs).
- Preview Deployment - If enabled, this deployment will be used to view the Preview version of a page. For this tutorial, you want to make sure this is marked as Yes.
- Production Deployment - If enabled, this deployment will be used to view the Published version of a page.
4. Click Save to register the deployment.
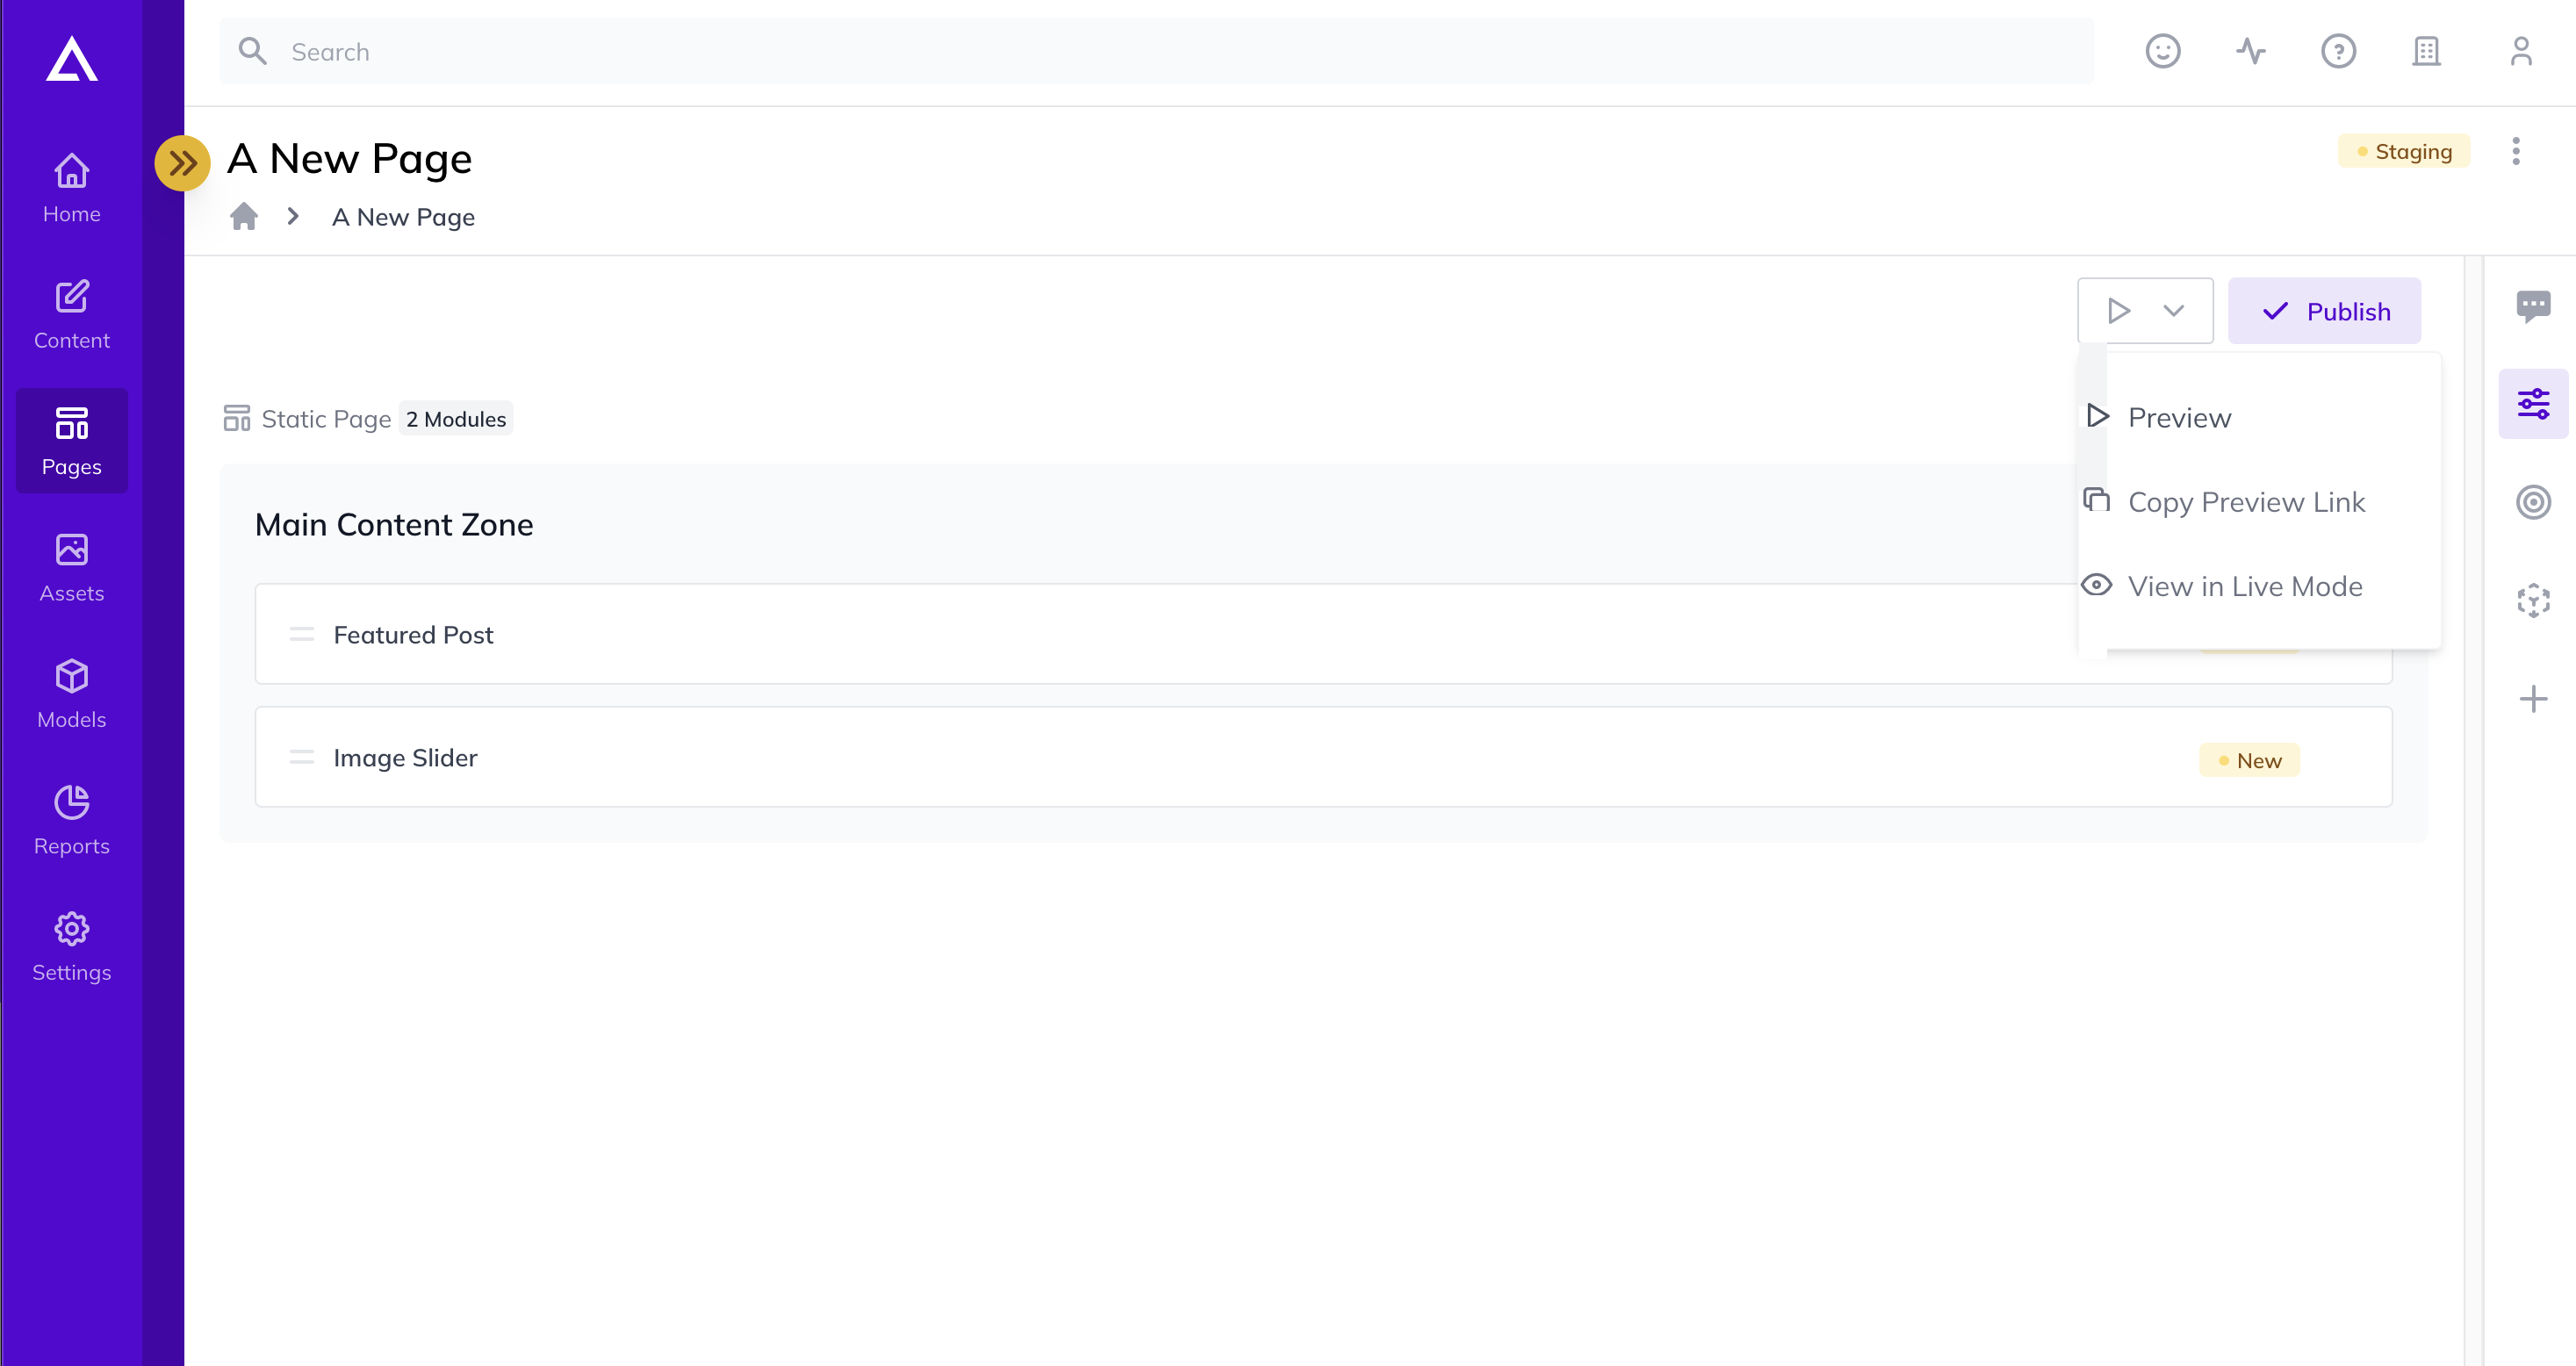
Test Previewing a Page
Now that you've configured your Preview Deployment, you should now be able to navigate to any Page within your Agility Instance, click Preview and a new tab should open with the URL of the page you wish to preview on your website.
Previewing From the Content (area)
Now that we have a preview site set up, when an Editor previews from a Page in Agility, it will automatically open the preview window based on the selected page path.
This works great when previewing from a page, however what if an Editor wants to preview their updates while working in the Content section of Agility?
We'll use a Blog Post as an example as it could potentially be accessed across multiple pages (think blog post details page, feature listings, etc..
By default, Agility will preview your homepage since it doesn't know what page URL you want to preview. To improve this experience, you can specify what URL should be loaded when you are viewing a piece of content outside the context of a page.
Setting a Preview Page for Content
1. Navigate to the Content section and select the content list you wish to set a preview page for.
2. Click on the Developer Settings tab.

3. Here you'll see three relevant fields to look at for setting-up your preview settings.
- List Preview Page - The page path that should be used if an editor clicks Preview when viewing a content list. In the above example,
~/blogis a listing page of our blog posts and a great place to direct editors. - Item Preview Page - The page path that should be used if an editor clicks Preview when viewing a specific item. In the above example,
~/blog/blog-postsactually represents a Dynamic Page that is used to render the details of each blog post. If you are using Dynamic Pages, then you should point it to that page. - Item Preview Query String Parameter - The name of the query string parameter that will be appended representing the ID of the current item. We recommend setting this value to ContentID.
Test Previewing a Content Item
Now that you've set up the preview paths for the content you want, you can test what URL this generates when an Editor clicks Publish.
The browser should open a tab with a URL that has the following format:
Example - https://next-on-azure.vercel.app/blog/blog-posts?ContentID=124&lang=en-us&agilitypreviewkey=xxxxxxxx&agilityts=20210923032201
https://{domain}{itemPreviewPage}
?{itemPreviewQueryStringParameter}={contentIDValue}
&lang={localeCode}&agilitypreviewkey={previewKeyValue}&agilityts={timestampValue}
Handling a Dynamic Page Preview Request
Now that you have a preview request with a ContentID parameter (or other name you may have specified in the Item Preview Query String Parameter field), you'll need to redirect this request to the actual friendly URL of the dynamic page you want to render.
First, you'll need to retrieve the actual URL for the dynamic page item. This is fairly straightforward to do and only requires a single API call to the Sitemap Flat endpoint in the Content Fetch API.
curl -X GET "https://api.aglty.io/xxxxxxxx-u/preview/en-us/sitemap/flat/website" -H  "accept: application/json" -H  "APIKey: defaultpreview.xxxxxxxxxxxxxxxxxxxxxx"
{
  "/home": {
    "title": "Home",
    "name": "home",
    "pageID": 2,
    "menuText": "Home",
    "visible": {
      "menu": true,
      "sitemap": true
    },
    "path": "/home",
    "redirect": null,
    "isFolder": false
  },
  "/blog": {
    "title": "Blog",
    "name": "blog",
    "pageID": 3,
    "menuText": "Blog",
    "visible": {
      "menu": true,
      "sitemap": true
    },
    "path": "/blog",
    "redirect": null,
    "isFolder": false
  },
  "/blog/travel-photography-101": {
    "title": "Travel Photography Tips: 101",
    "name": "travel-photography-101",
    "pageID": 14,
    "menuText": "Travel Photography Tips: 101",
    "visible": {
      "menu": false,
      "sitemap": false
    },
    "path": "/blog/travel-photography-101",
    "redirect": null,
    "isFolder": false,
    "contentID": 112
  },
  "/blog/am-eh-zing-places-to-visit-in-canada": {
    "title": "Am-EH-zing Places to Visit in Canada!",
    "name": "am-eh-zing-places-to-visit-in-canada",
    "pageID": 14,
    "menuText": "Am-EH-zing Places to Visit in Canada!",
    "visible": {
      "menu": false,
      "sitemap": false
    },
    "path": "/blog/am-eh-zing-places-to-visit-in-canada",
    "redirect": null,
    "isFolder": false,
    "contentID": 113
  },
  "/blog/virtual-tours-ways-to-travel-from-home": {
    "title": "Virtual Tours - Ways to Travel From Home",
    "name": "virtual-tours-ways-to-travel-from-home",
    "pageID": 14,
    "menuText": "Virtual Tours - Ways to Travel From Home",
    "visible": {
      "menu": false,
      "sitemap": false
    },
    "path": "/blog/virtual-tours-ways-to-travel-from-home",
    "redirect": null,
    "isFolder": false,
    "contentID": 124
  },
  "/about": {
    "title": "About",
    "name": "about",
    "pageID": 9,
    "menuText": "About",
    "visible": {
      "menu": true,
      "sitemap": true
    },
    "path": "/about",
    "redirect": null,
    "isFolder": false
  }
}
In the response of this call, you would look for a sitemap node that has the contentID value that matches your ContentID value that was passed in the preview request URL.
For example, if we are previewing a blog post with the contentID value of 124, then I would find the sitemap node matching that ID.
"/blog/virtual-tours-ways-to-travel-from-home": {
    "title": "Virtual Tours - Ways to Travel From Home",
    "name": "virtual-tours-ways-to-travel-from-home",
    "pageID": 14,
    "menuText": "Virtual Tours - Ways to Travel From Home",
    "visible": {
      "menu": false,
      "sitemap": false
    },
    "path": "/blog/virtual-tours-ways-to-travel-from-home",
    "redirect": null,
    "isFolder": false,
    "contentID": 124
  },
Lastly, you would redirect the request to the path value returned in the matched sitemap node (/blog/virtual-tours-ways-to-travel-from-home).
Generating a Preview Link in Code
The Agility Content Manager automatically generates an agilitypreviewkey and appends this to the page path of the page you are intending to view - i.e. https://mysite.com/?agilitypreviewkey={key}. This allows Agility users to preview website pages.
However, there might be some cases where you may want to generate preview links in your own application. This can be helpful when you are integrating with other services, building custom reports, workflows, or managing content outside of Agility.
You can do this by using the code block below to generate your own preview key and append it to the target page URL.
//get your website security key and build a byte array
string securityKey = Settings.CurrentSettings.WebsiteSettings[AgilityContext.WebsiteName].SecurityKey;
byte[] data = UnicodeEncoding.Unicode.GetBytes(string.Format("{0}_{1}_Preview", -1, securityKey));

//hash it & convert to base64
SHA512 shaM = new SHA512Managed();
byte[] result = shaM.ComputeHash(data);
string previewKey = Convert.ToBase64String(result);

//generate preview link
string previewUrl = string.Format("https://myagilitysite.com/?agilitypreviewkey={0}", previewKey);