How The Gatsby Starter Works
The Gatsby Starter showcases features such as our native Page Management and shows how you should structure your Gatsby website. This starter serves an example based on our recommended best-practices.
Sourcing and Querying Content
The Gatsby Blog Starter uses our official gatsby-source-agilitycms plugin, which means that all of your content, modules, sitemaps, and pages will be synchronized with your Gatsby site and available via GraphQL.
Configuring the Plugin
The plugin is registered in the gatsby-config.js file in your Gatsby site along with several configurable options that influence the behaviour of the plugin.
const agilityConfig = {
  guid: process.env.AGILITY_GUID,
  apiKey: process.env.AGILITY_API_KEY,
  isPreview: process.env.AGILITY_API_ISPREVIEW === "true"
}
module.exports = {
    plugins: [
    {
      //the name of the plugin
      resolve: "@agility/gatsby-source-agilitycms",
      //the options for our plugin
      options: {
        //your Agility Content Fetch API Guid
        guid: agilityConfig.guid,
        //your Agility Content Fetch API Key
        apiKey: agilityConfig.apiKey,
        //set this to true if you are using the preview API Key
        isPreview: agilityConfig.isPreview,
        //set this to true to see expanded traces in the build logs
        debug: false,
        //the languages you want to source content for
        languages: [{
          // The name of the language code
          name: "English",
          // The actual language code set in Agility CMS
          code: "en-us",
          // The name to be used in the URL path that represents the current language
          path: "en"
        }],
        // The channels you want to include
        channels: [{
          // The reference name for the website channel as it is defined in Agility CMS
          referenceName: "website"
        }],
         //the page template that will be used to render Agility CMS pages
        masterPageTemplate: "./src/AgilityPage.jsx"
      }
...
]...}
How Sourcing Content Works
The source plugin uses our @agility/content-sync package behind the scenes, which ensures that only content that has changed is updated. It keeps things in-sync for you.
This means your first build will download all of your content, while subsequent builds only update what has changed. This enables incremental builds and results in bleeding-edge, fast build times.
Need to Re-Sync?
If you want to force a full-resync (clears all cached/sourced content), you can run: `gatsby-clean` in your command line. The next time you run `gatsby develop` or `gatsby build it will source and download all of your content again.
Accessing Your Content
All of your content is downloaded and stored in the Gatsby GraphQL. You can explore all of the content in your GraphQL and auto-generate queries for you to use in your Gatsby site.
When running your site locally using gatsby develop, you can view the GraphQL Playground by navigating to http://localhost:8000/___graphql.
Re-build to update Content
In order for content from the CMS to be refreshed, you need to re-build the site. You can do this locally by re-running `gatsby develop`.
Content
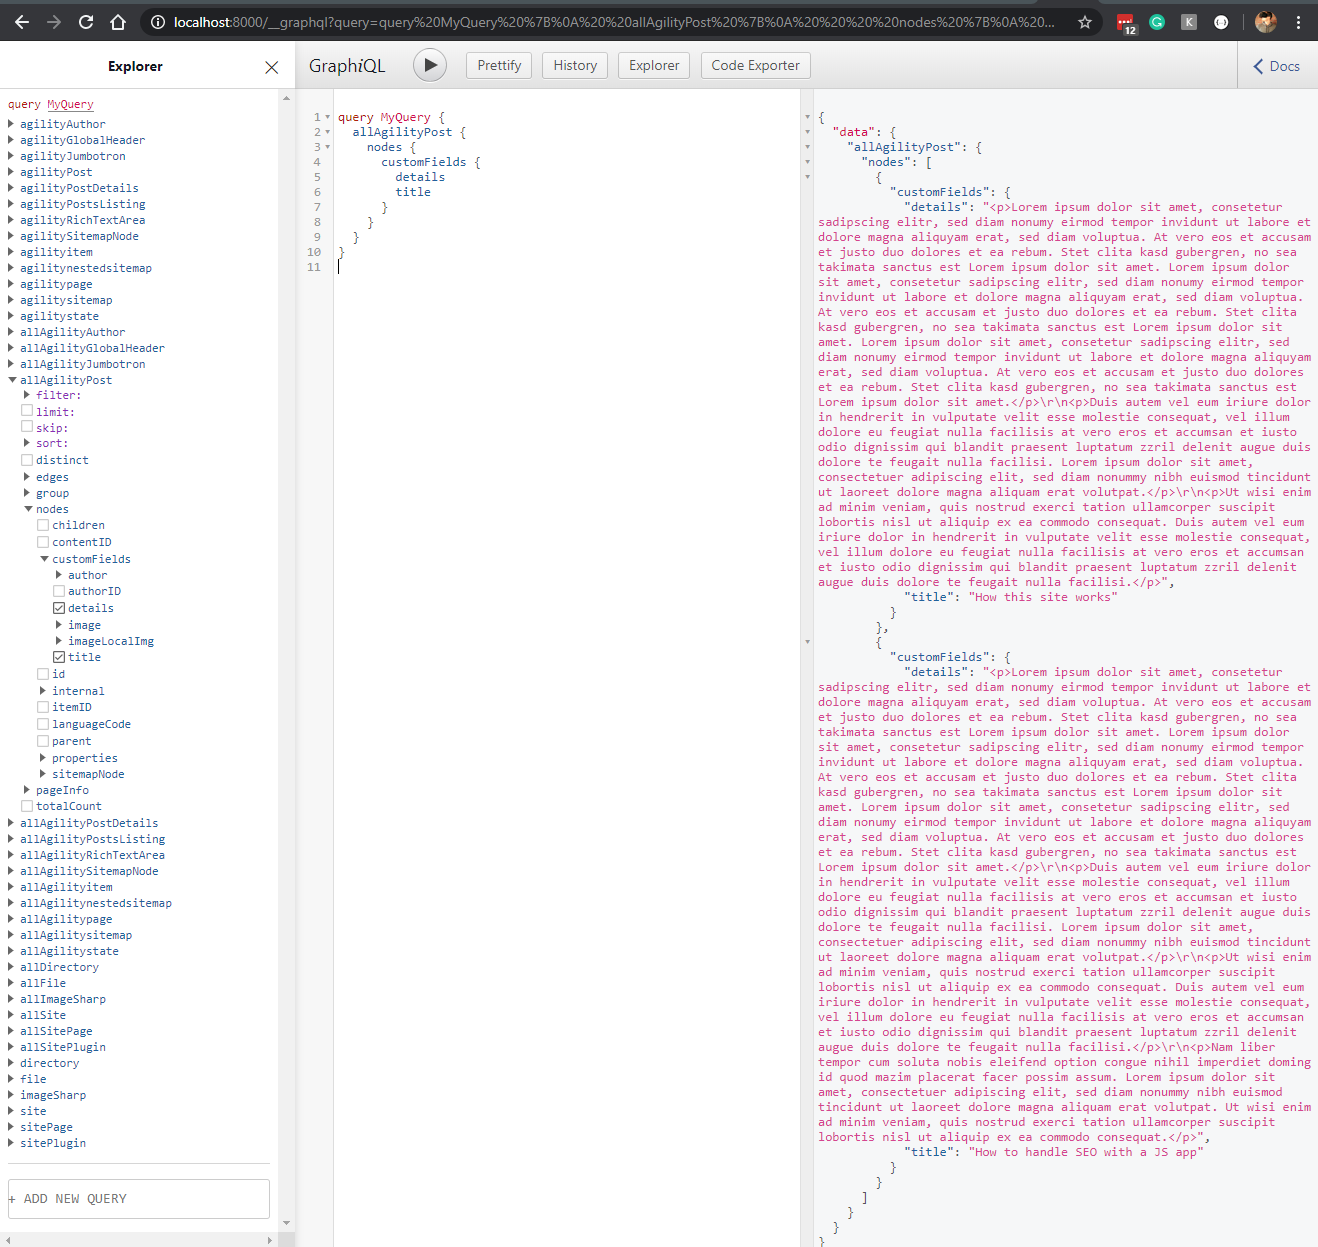
To query content from Agility CMS, you would query allAgility<contentTypeName>, for example, allAgilityPost, then select what fields you want to retrieve for each item.
query MyPosts {
  allAgilityPost {
    nodes {
      customFields {
        details
        title
        image {
          url
        }
      }
    }
  }
}
Page Modules
To query modules on pages from Agility CMS, you would query allAgility<moduleTypeName>, for example, allRichTextArea, then select what fields you want to retrieve for each item.
query MyRichTextAreaQuery {
  allAgilityRichTextArea {
    nodes {
      customFields {
        textblob
      }
    }
  }
}
Pages
To query a page from Agility CMS, you would query allAgilitypage.
It is important to note that Pages store information pertaining to which modules and their fields are on the page, so due to the dynamic nature of this data, there is only a single pageJson property that contains the page fields serialized into a string.
You can easily convert this into an object within the Gatsby site and pass each module's fields as props to your react components responsible for rendering each module. This is exactly how the Gatsby Blog Starter site is configured.
Sitemap
To query a sitemap from Agility CMS, you would query allAgilitySitemapNode.
query MySitemapQuery {
  allAgilitySitemapNode {
    nodes {
      name
      pageID
      path
      languageCode
      isFolder
      contentID
    }
  }
}
Routing and Pages
When using Agility CMS, we believe Editors should have full control over the pages on their website and should not need to rely on a developer. The Gatsby Blog Starter makes it easy to source content and also generates the pages of your website based on your sitemap in Agility CMS.
Editors in the CMS can control what pages are available, what the URLs are, what page template they're using, and exactly what UI Components (Modules) make up each and every page.
Each Agility CMS page is composed and generated dynamically at build-time using a masterPageTemplate that you define in your gatsby-config.js plugin options.
Page Generation
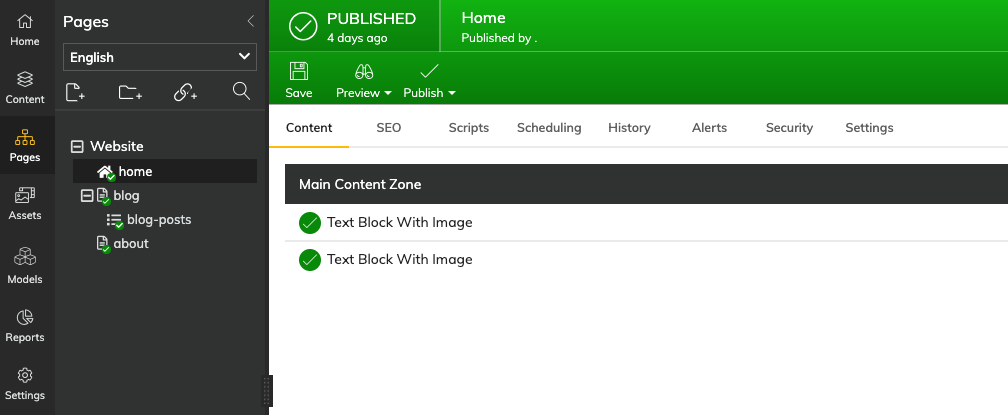
The above figure represents a sitemap of Pages as well as the UI Components (Page Modules) that are on each page - all are managed in the CMS.
This means that when a build occurs in your Next.js site, the following pages will be auto-generated for you:
/

/blog

/blog-posts/* - your dynamic page route for all of your blog posts (i.e. /blog/my-first-post)

/about
Page Rendering
When a Page is being generated during build time, the final step is rendering the page to HTML. In order to do this, you must provide a Master Page Template React component. This will be your layout used for each rendered Agility CMS page.
In the Gatsby Blog Starter, this in configured in the gatsby-config.js file.
module.exports = {
  siteMetadata: {
    title: "Agility CMS Gatsby Starter",
  },
  plugins: [
    ...
    {
      //the name of the plugin
      resolve: "@agility/gatsby-source-agilitycms",
      //the options for our plugin
      options: {
        ...
         //the page template that will be used to render Agility CMS pages
        masterPageTemplate: "./src/AgilityPage.jsx"
      },
    },
    ...
  ]
}
Sample source code for AgilityPage.jsx:
import React from "react"
import { graphql } from "gatsby"
import agilityUtils from "./agility/utils"
import { getPageTemplate } from "./components/agility-pageTemplates"
import PreviewBar from "./components/common/PreviewBar"
import SiteHeader from "./components/common/SiteHeader"
import SiteFooter from "./components/common/SiteFooter"
import SEO from "./components/common/SEO"

//Our query to get the our page data and check for a dynamic page item (agilityItem)
export const query = graphql`
  query($pageID: Int!, $contentID: Int!, $languageCode: String!) {
    agilitypage(languageCode: { eq: $languageCode }, itemID: { eq: $pageID }) {
      pageJson
    }
    agilityitem(
      languageCode: { eq: $languageCode }
      itemID: { eq: $contentID }
    ) {
      itemJson
    }
  }
`
const AgilityPage = ({ pageContext, data }) => {
  // build the page view model
  const viewModel = agilityUtils.buildPageViewModel({ pageContext, data })

  // get our page template
  const AgilityPageTemplate = getPageTemplate(
    viewModel.page.templateName.replace(/\s/g, "")
  )

  // if dynamic page, use that description as meta description
  if (viewModel.dynamicPageItem?.seo?.metaDescription) {
    viewModel.page.seo.metaDescription =
      viewModel.dynamicPageItem.seo.metaDescription
  }

  return (
    <>
      <SEO
        title={viewModel.page.title}
        description={viewModel.page.seo.metaDescription}
        keywords={viewModel.page.seo.metaKeywords}
        ogImage={viewModel.dynamicPageItem?.customFields?.image?.url}
      />
      <PreviewBar isPreview={viewModel.isPreview} />
      <div id="site-wrapper" className="flex flex-col min-h-screen">
        <SiteHeader
          languageCode={viewModel.languageCode}
          isMultiLanguage={viewModel.isMultiLanguage}
        />
        <main className="flex-grow">
          <AgilityPageTemplate {...viewModel} />
        </main>
        <SiteFooter />
      </div>
    </>
  )
}

export default AgilityPage
Page Rendering Process
Your React Master Page Template dependency is resolved, then proceeds to run the component.
The GraphQL Page Query is run for the current Agility CMS page being rendered.
//Our query to get the our page data and check for a dynamic page item (agilityItem)
export const query = graphql`
  query($pageID: Int!, $contentID: Int!, $languageCode: String!) {
    agilitypage(languageCode: { eq: $languageCode }, itemID: { eq: $pageID }) {
        pageJson
	}
    agilityitem(languageCode: {eq: $languageCode}, itemID: {eq: $contentID}) {
		itemJson
    }
}`
The result of the query is passed as the data prop to the AgilityPage component.
The result of the query includes a JSON string (data.agilityPage.pageJson) representing the page object, and may also include a JSON string (data.agilityItem.itemJson) representing a dynamic page item (i.e. if you are rendering a blog post).
const AgilityPage = ({ pageContext, data }) => {
    ...
}
The data is massaged into a viewModel object that is used to pass as props to render components for the page.
const AgilityPage = ({ pageContext, data }) => {
    const viewModel = agilityUtils.buildPageViewModel({ pageContext, data });
			...
    );
}
viewModel.page - contains page-level properties, as well as for instructions on which inner page template to use, and each module (and its fields) that are on the page.
viewModel.dynamicPageItem - if the current page being rendered is a dynamic page, then this will give you a reference to the dynamic item and its fields.
viewModel.isPreview - is set to true/false depending on whether you've set you are in preview mode or not (via gatsby-config.js)
The page viewModel is passed to the <AgilityPageTemplate {...viewModel} /> component. This component will render the corresponding react page template that the current page depends on.
The page template uses the <ContentZone /> component to identify where modules for specific zones should be rendered within the page template.
import React from "react"
import ContentZone from "../../agility/components/ContentZone"
import { getModule } from "../../components/agility-pageModules"

const OneColumnTemplate = props => {
  return (
    <div id="main-template">
      <ContentZone name="MainContentZone" {...props} getModule={getModule} />
    </div>
  )
}
export default OneColumnTemplate
Within each <ContentZone /> component defined in the template, each module that exists on the content zone in the CMS is resolved to a react component and rendered in-place.
Page Modules
In Agility CMS, Page Modules are functional components Editors use to compose what type of content is on each page and in what order they appear.
Developers define what page modules are available in the CMS and what fields they consist of. Each Module defined within Agility CMS should have a corresponding React Component in your Gatsby site.
If modules are not defined, or the editor do not add modules to pages, then there won't be anything to output on your pages.
An Example
In the Gatsby Blog Starter site, the name of the page module is used to find a corresponding react component that matches the same name. If a match is found, that component is dynamically imported and rendered.
For example, if a module has a reference name of RichTextArea in the CMS, then while the page is being rendered by the gatsby-source-agilitycms plugin, it will look for RichTextArea.jsx in the agility-pageModules directory.

Internally, the <ContentZone /> component will dynamically import the module and pass all the field values for that module as props.
import React from "react"
import { renderHTML } from "../../agility/utils"

const RichTextArea = ({ module }) => {
  // get module fields
  const { customFields } = module

  return (
    <div className="relative px-8">
      <div className="max-w-2xl mx-auto my-12 md:mt-18 lg:mt-20">
        <div
          className="prose max-w-full mx-auto"
          dangerouslySetInnerHTML={renderHTML(customFields.textblob)}
        />
      </div>
    </div>
  )
}

export default RichTextArea
Did you notice that we haven't used any GraphQL to get our data? That's because the data is already retrieved in the initial GraphQL page query and it simply passed as props to our UI.
How to Query GraphQL in a Page Module
While it's convenient that the fields on your modules are automatically passed to your React components, there will be cases where you'll need to access content that is not associated with your modules, such as content stored in the Content section in the CMS.
For these cases, you'll need to formulate a Static GraphQL query. Gatsby provides a useful tool called useStaticQuery, which is a React Hook used to query GraphQL data at build time.
An example Static Query used in a PostListing module that lists blog posts:
import React from "react"
import { Link, graphql, useStaticQuery } from "gatsby"
import { AgilityImage } from "@agility/gatsby-image-agilitycms"

const PostListing = () => {
  // graphql query for posts data
  const data = useStaticQuery(graphql`
    query {
      posts: allAgilityPost(
        filter: { properties: { referenceName: { eq: "posts" } } }
        sort: { fields: customFields___date, order: DESC }
      ) {
        nodes {
          customFields {
            title
            date(formatString: "MMMM DD, YYYY")
            image {
              url
              label
            }
            content
            category {
              contentid
            }
          }
          sitemapNode {
            path
          }
          linkedContent_agilityCategory {
            customFields {
              title
            }
          }
        }
      }
    }
  `)

  // get posts
  const posts = data.posts.nodes

  return(
  	...
  )

}

export default PostListing
How to Add a New Page Module
If you create a new Page Module within Agility CMS, you'll want to create the corresponding React component for it within the agility-pageModules directory.
All of the Page Modules that are being used within the site need to be imported into the index file within the agility-pageModules directory and added allModules array:
import RichTextArea from "./RichTextArea";
import FeaturedPost from "./FeaturedPost";
import PostsListing from "./PostsListing";
import PostDetails from "./PostDetails";
import Heading from "./Heading";
import TextBlockWithImage from "./TextBlockWithImage";

// All of the Agility Page Module Components that are in use in this site need to be imported into this index file.
// Place Page Modules in allModules array below, passing in a name and the component.

const allModules = [
  { name: "TextBlockWithImage", module: TextBlockWithImage },
  { name: "Heading", module: Heading },
  { name: "FeaturedPost", module: FeaturedPost },
  { name: "PostsListing", module: PostsListing },
  { name: "PostDetails", module: PostDetails },
  { name: "RichTextArea", module: RichTextArea },
];

export const getModule = (moduleName) => {
  if (!moduleName) return null;
  const obj = allModules.find(
    (m) => m.name.toLowerCase() === moduleName.toLowerCase()
  );
  if (!obj) return null;
  return obj.module;
};
If there is no React component for your module, then nothing can be rendered for it in your Gatsby site.
How to Change the Fields
You can alter your fields at any time and the field values passed to your component will update automatically the next time you run another build.
Page Templates
Page Templates in Agility CMS allow developers to differentiate the styles of certain types of pages, and also define where on the page editors can add and edit Page Modules (functional components of the page that editors can control).
Depending on your scenario, some sites may only use a single page template and re-use it across the site, while other sites may have multiple templates to allow for more flexible layouts.
What's in a Page Template?
When editors create pages in Agility CMS, they must select which template they'd like to use.
A Page Template consists of a Name and Content Zones.
The Name should represent what the editor can expect from using the Page Template. For example, a site may have templates named One Column Template, Two Column Template, or Blog Template.
A Content Zone is an area defined in the Page Template where an editor can add, edit, or remove modules. A Page Template can have one or many Content Zones.
An Example
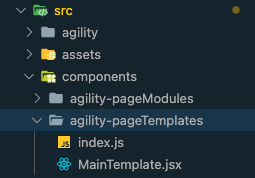
In the Gatsby Blog Starter site, the Name of the Page Template is used to find the corresponding React Component that matches the same name. If a match is found, that Component will be dynamically imported and rendered for you.
For example, if a Page Template has the name of Main Template in the CMS, while the page is being rendered, it will look for MainTemplate.js inside of the agility-pageTemplates directory.
Reviewing the example AgilityPage.jsx from Gatsby Blog Starter site, the <AgilityPageTemplate/> component will automatically take care of resolving and rendering the appropriate page template.
From AgilityPage.jsx:
const AgilityPageTemplate = getPageTemplate(
    viewModel.page.templateName.replace(/\s/g, "")
  )
From MainTemplate.jsx:
import React from "react"
import ContentZone from "../../agility/components/ContentZone"
import { getModule } from "../../components/agility-pageModules"

const OneColumnTemplate = props => {
  return (
    <div id="main-template">
      <ContentZone name="MainContentZone" {...props} getModule={getModule} />
    </div>
  )
}
export default OneColumnTemplate
How to Add a New Page Template
When you create a new Page Template within Agility CMS, you'll want to create the corresponding React component for it within the agility-pageTemplates directory.
All of the Page Templates that are being used within the site need to be imported into the index file within the agility-pageTemplates directory and added allTemplates array:
import MainTemplate from "./MainTemplate";

const allTemplates = [
 { name: "MainTemplate", template: MainTemplate }
];

export const getPageTemplate = (templateName) => {
  if (!templateName) return null;
  const obj = allTemplates.find(
    (m) => m.name.toLowerCase() === templateName.toLowerCase()
  );
  if (!obj) return null;
  return obj?.template;
};
If there is no corresponding React component for your Page Template, then nothing can be rendered for it on your Gatsby site.
How to Add a Content Zone
You can alter your content zones at any time, you'll simply have to utilize the <ContentZone /> component within your page template React component. This tells the Gatsby build where to render the modules for this content zone in your code.
For example, this means that all modules in MainContentZone for a page are to be rendered here:
<ContentZone name="MainContentZone" {...props} getModule={getModule} />
Optimizing Images
Where possible, we always recommend storing your images in Agility CMS's Assets area. These are automatically deployed to a CDN and support basic image transcoding via query-strings. You can simply continue to use the CDN URLs provided for your content without any additional work.
However, one of the primary benefits of having a static website is that nothing on your site can change without a new build. This ensures your website updates are atomic. If you are using CDN links to images though, in your site, one could alter an image and that change would take effect immediately on your site. You'd also have no way of reliably rolling back your site to a previous version since the images on the CDN are managed separately.
Using AgilityImage
AgilityImage is a wrapper for Gatsby Plugin Image that comes configured to change image URL parameters to resize, change format as well as image quality on our CDN.
The Gatsby Blog Starter already has this configured for you out of the box, however, if you want to include this on a new site, there are a few steps you need to take before you start using the AgilityImage component.
- Update the package.json in your Gatsby project to use the Gatsby V3 and install the new Gatsby Image Plugin:
npm install gatsby@latest gatsby-plugin-image
- Install the
AgilityImagecomponent and update thegatsby-source-agilitycmsplugin to the latest version:
npm install @agility/gatsby-image-agilitycms @agility/gatsby-source-agilitycms@latest
- Add
gatsby-plugin-imageto yourgatsby-config.jsfile:
module.exports = {
   plugins: [
    ...
    `gatsby-plugin-image`,
   ]
}
The AgilityImage component accepts the following props:
image = The object of your image from Agility.
layout = Determines the image sizes that are generated, as well as the resizing behaviour of the image itself in the browser (constrained, fixed, fullWidth)
Example
import { AgilityImage } from "@agility/gatsby-image-agilitycms"

<AgilityImage image={image} layout={fullWidth} />